Is it a trunk or a boot? Who really cares, I’m talking about the back. As we did with the front portion, this step of our Bugatti kart involved trimming a sheet of galvanized steel to size and carefully wrapping it around the wooden framing we’ve previously put in place.
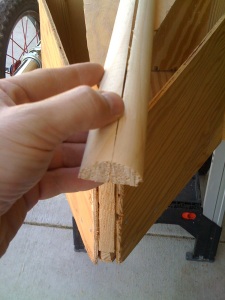
But, before we were able to sit down and get to business with the steel sheet I needed to consider the point or tail edge itself. You see where the left and right sides of the body meet in the tail, we ended up with an edge that was approximately one and a half inches wide.
Had I been more careful with the body and tail assembly I probably could have significantly reduced this to the point that all it needed was a bit of good filing and some elbow grease. But alas, I didn’t think that far ahead and here we are… with a bit of a challenge. Nothing insurmountable, just something else to keep me on my toes with this project.
I figured that I could probably use some simple wood moulding/trim to finish this off so I headed to my second home (Home Depot that is). I wasn’t able to find a single half-round that was the right size, so I settled on quarter round pieces that I figured we could just glue together.
I roughed up the pieces, applied a generous amount of wood glue, and held them together with rubber bands for a few hours.
After gluing the two pieces of moulding together, I then glued the entire single piece onto the back of the kart. To hold this all nice and firm against the kart I then wrapped a few lengths of painters tape around the tail which applied constant pressure to the glued surfaces.
After a few hours of drying, leaving the tape in place, I next drilled a few pilot holes through the moulding into the kart body. Since I knew I would be filing this down and generally putting some elbow grease into it, I wanted to make sure it wasn’t going to go anywhere.
Once the pilot holes were complete I set a few 2″ finishing nails through the moulding, attaching it securely to the kart. This piece wasn’t going anywhere that’s for sure.
Now… to think about exactly how the steel sheet would mount. I knew it would be wrapped around the shape much like we had done in the front, but I wasn’t quite sure how I would finish of the very edge where we have our moulding.
After some serious consultation with the boys (“Oh yeah sure Dad, whatever you say.”) I figured I would first put a rough layout together with newspaper.
One of the challenges we had with the front was that I didn’t use a template, but rather just measured and cut it out. I shot from the hip you might say.
In doing this I did a fair amount of trimming as we were mounting it and that was something I wanted to try to avoid here if I could. The final result there was fine, but I think in retrospect I could have made it fit better had I taken a slightly different approach. Live and learn as they say. Anyway…
With the newspaper taped in place I sketched the perimeter lines with a Sharpie to indicate the final shape that I wanted our sheet metal. I then removed the newspaper and trimmed it along the lines we just placed on it thus creating my template.
With our newspaper template now complete I placed it onto the sheet metal and once again using our Sharpie, outlined the shape. I was sure to give myself an extra half inch or so all around just to be safe.
It was about this time that one of the neighborhood kids (a girl in fact) came by and said “I wish my Dad would build me one of these.” Awesome. I must be doing something right here.
Once we outlined our template I then picked up our cheap Harbor Freight cutting shears and cut it out. The shape of our panel once mounted will follow along the seat back, along the sides following the top of the tail, and will meet at the new tail piece we put in place.
At the top of the tail I decided to shape the steel to match that of the half-round moulding and bend the sides around to meet it. Once it was all cut, the next step we took was to place marks at 3″ intervals around the edge of our steel and drill pilot holes through the steel. Every 3″ may seem a bit extreme, but it’s mainly to keep the steel snug against the wood.
With our pilot holes in place we next set the steel into position, with the back of it sitting nice and snug onto the seat back. Once I was happy with the side to side positioning I then set this first screw into the back center.
To try to avoid the buckling we experienced with the front, I then worked outward from this center screw along the length. After setting a couple of more screws I went ahead and set the center of the rear (this is right on the moulding we mounted) to insure the steel stayed put.
Little by little the stability and strength of our sheet increased until we had all the screws set except the final two on both sides of the rear point.
I had intentionally left these loose while I considered how best to get the final bit of moulding covered. I suppose I could have done it as one complete piece but the thought of cutting segments out, with the intention that they would miraculously meet perfectly in the middle was a gamble I didn’t think I’d win. I figured working with two separate pieces just be easier to deal with.
Since we had the very top of our moulding covered (we cut a slight half circle) we only had to consider wrapping around and meeting with the already set steel on the sides. No sweat right?
I secretly borrowed my wife’s sewing measuring tape (shhhh!) and wrapped it around our moulding and measured the distance from our steel on side to the steel on the other.
The amount of scrap we had sitting around was perfect for a piece this small. It was easy to work with in that it was only roughly 6″ wide at the bottom and 3 1/2″ wide at the top. I cut it out and was careful to hit with some 100 grit sand paper I had sitting around. This removed the sharp edges that were left behind when cutting it up.
Next I went ahead and drew a line down the center, so that I could align it with the center of our moulding. We will then carefully bend it around to meet up with the partially mounted sheet… well that’s the idea anyway.
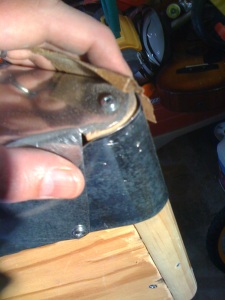
I positioned our scrap onto the moulding and carefully bent it, sliding it underneath our already mounted piece. This way we will end up with a relatively clean line of our steel and the larger piece will effectively clamp down our smaller piece nice and tight. It worked perfectly and didn’t look half bad.
As I mentioned before, so far we’ve had relatively little buckling which is great to see. The steel is bent to the curve of the wooden body and there aren’t anywhere near the bends and dents we ended up with on the front. With this final piece in place I think it will all be nice and tidy.
Once I had the sides of our scrap slid in place underneath the already mounted main piece, I then ran a screw through each side to hold it all together.

Close up revealing our installation with relatively little buckling. You can see where both pieces were screwed together near the tail.
Next with the corners screwed in, I then ran an additional screw about midway up our scrap piece, securing it firmly in place. We now had the moulding completely covered, or wrapped around.
I discovered that in the top of the tail section, where the pieces met, a little tap here and there with a ball peen hammer did a world of good. These little taps just ever so slightly bent these raised points inward, towards the wood body making for a smoother overall finish.
After mounting this piece we still have just a hair of wood visible through the gap where the pieces meet, but it’s relatively little and isn’t really a big deal. Once we’re all painted I think it won’t be all that noticeable.
With this step we’ve completed all of our steel work for the body. I have some things in mind with regards to the grill but I think that will fall into place after we do some priming of the body and wood.
To prepare for priming the next step will be removing all of the exhaust, the wheels, and taping off anything with the steering components we don’t want painted.
Stay tuned, with Spring just around the corner I don’t expect our next step to be too far off.


