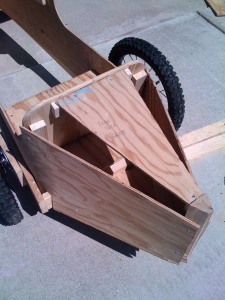
The work with this part of the project includes adding the rear tail top brace, the body panel rails and the dashboard, or rather the little dashboard.
The addition of the boat tail top brace, which consists of 1/4″ plywood was pretty straightforward. You can see that it mounts on the top of the seat bracket and extends across the tail, and mounts to the vertical brace I had mounted earlier.
You may be wondering about the large gap that exposes the inside of the boat tail? Me too. Well it turns out all of that will be totally hidden since the top half of the tail will be completely covered with aluminum sheeting. The top brace is just that… a brace. It won’t even be seen.
The boys were wondering if this was a trunk that they could hide “stuff” in. Stuff would amount to various rocks and brightly colored air gun BBs that they seem to find all over the neighborhood. It did make me wonder if it would be worthwhile to make the top hinged. They could use it as a trunk, and I could have easy access to add a motor later. Hmmm I’ll have to think about that…
At this point, aside from the consideration of a hinged lid, the boat tail is now more or less structurally complete. Next was to mount braces on the inside of the body panels, at the top, that will provide a place to mount the body panel top. For this I cut two 2×2 pieces at 23″ long. I positioned them at the very top edge of the body panels, drilled pilot holes, and ran 1 1/4″ screws in from the inside of the panels out, spacing them out about 4″ apart.
Once panel braces were mounted I turned my attention to the tiny dash. The dash seemed fair sized at first glance, until I cut it out and held it up. I was thinking of going hog wild and even mounting a speedometer in it…. I still may, but not sure how much space I’ll have to put it in. Maybe a vintage analog speedometer from a Schwinn bike would work?
Once I cut the dash out of the 1″ pine stock, I drilled a 1″ hole in the center to accommodate the steering column. Next I positioned it into the body and held it in place with a clamp. At this point I wanted to determine a few things before mounting it permanently- specifically will the dash be high enough to provide space for the boys’ knees?
Remember, this is going to be powered with a crank and pedals. Additionally I needed to determine where I will be mounting the lower portion of the steering column as it mounts at the very bottom of the grill. This is where it will connect to the steering linkage, etc. To help determine this I temporarily placed a piece of PVC pipe in the place of the steering column to determine if I had the angle of the dash correct.
It looked fine, but I figured I’d have one of the boys come sit in it to confirm. Luke came over and sat down. The PVC pipe was a bit long and it was hitting him in the nose. No permanent damage, besides I figured it was a small price to pay and would only build character.
“Don’t worry, this pipe is only to check something.” I said. “I won’t leave it… there we go, thanks for the help.” and off he went in search of his next Otter Pop, to spray his brothers with a garden hose, or likely both.
Once I determined the position of the dash was good I drilled pilot holes from the outside body panels, into the side of the dash. I then set two 1″ wood screws on each side and removed my clamp.
Next I got my shopping list together to get the steering column in place. As with the spindles, the steering column (and related pieces) are all based on galvanized pipe components. I’ll try to get over to the local Home Depot this weekend and with any luck will have a steerable kart here pretty soon. I need to get the steering column in place before I attempt what I suspect will be the most challenging part of this whole project….the crank assembly. I’m both looking forward to that and dreading it as I know it’s going to be a real challenge.
While I still had some daylight left I went ahead and cut out the body panel top that will mount on the two rails I previously installed. I won’t actually mount this top panel yet, but just cut it to fit and set it in place for now. I’ll mount it after the steering and crank is in place since having access to these things from the top will make my life much easier.
At this point we’re pretty far along with our dash, tail, spindles, mounted wheels, grill, seat, dash and of course the body itself.
The other day while we were talking about the progress Nick said “You’re the best dad ever!” which makes this project, and every other project before and after all the more worthwhile.


